





One characteristic of epoxy resin is its shiny, tough glass-like finish. But even the best-laid plans can result in some sanding. Sanding may be necessary for the finishing process as well, if the surface is dusty or has bubbles, scratches, or uneven edges, or if another coat is required.
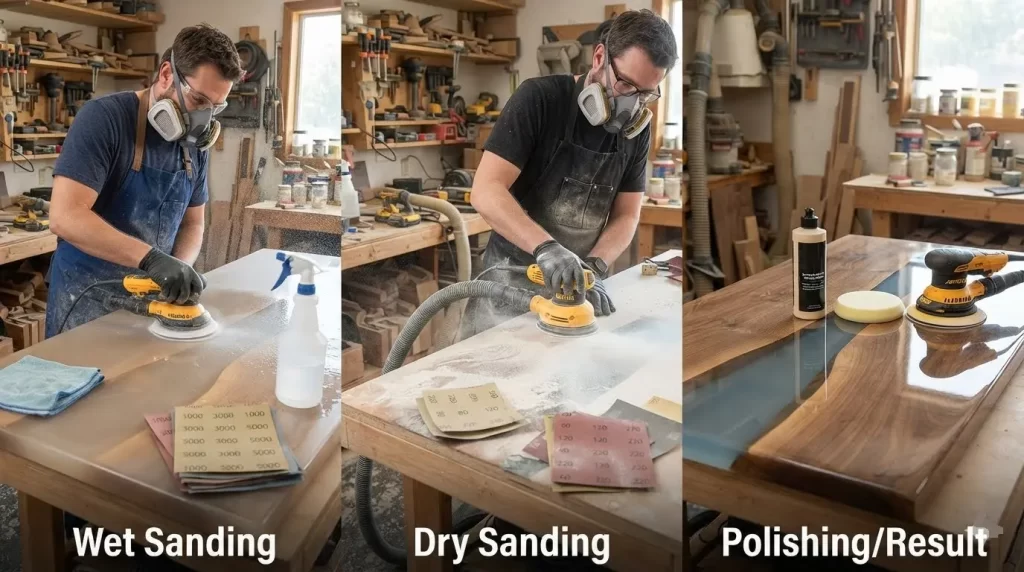
Don't be intimidated if the surface becomes dull, cloudy or scratched after sanding epoxy. This is quite common. Epoxy resin can be sanded and finished right to become smooth and shiny, looking like a pro with the help of proper sanding technique and finishing.
You will find out how to safely sand epoxy resin to be used in safe ways, what grit of sandpaper to use, how to repair common surface imperfections, how to smooth edges of resin, how to prepare cured epoxy for the second application and how to get a shiny surface or a matte one back.
Can You Sand Epoxy Resin?
Yes. It can be successfully sanded if the epoxy resin is fully cured.
There are many reasons for sanding epoxy resin:
- Preparing a cured surface for another resin layer
- Removing dust, hairs, bubbles, or other imperfections
- Repairing scratches or surface damage
- Leveling uneven resin surfaces
- Smoothing sharp edges
- Creating a matte or satin finish
- Preparing resin for polishing or recoating
It is important to ensure that the epoxy cures to the manufacturer's requirements before starting. If the resin is sanded before it reaches a proper hardness it can cause damage and leave the surface uneven.
Safety Equipment for Sanding Epoxy Resin
Fine dust is formed when epoxy is sanded, this is an important issue for proper protection. Set up a clean and breezy work area before you get started.
Suggested protection equipment:
- A suitable dust mask or respirator
- Safety glasses or protective eyewear
- Gloves
- Long sleeves if you are sanding for an extended period
Fine sanding dust should not be allowed to accumulate around your work area. Clean the workspace after sanding and remove dust carefully before applying another coating.
Choosing the Right Sandpaper Grit for Epoxy Resin
The best sandpaper grit depends on your goal. Coarser sandpaper removes material more quickly, while finer grits refine the surface and reduce visible scratches.
80–120 Grit: Heavy Sanding and Surface Preparation
Coarse sandpaper is useful when you need to:
- Remove major imperfections
- Sand away bubbles or deep surface defects
- Level an uneven area
- Roughen cured epoxy before applying another coat
When preparing a cured resin surface for another epoxy layer, you generally do not need to remove a large amount of material. The objective is to create a uniformly scuffed surface that gives the next layer a better mechanical bond.
150–320 Grit: Refining the Surface
Medium-fine grits are useful for smoothing sanding marks and refining areas where more control is needed.
These grits can be especially helpful around:
- Thin resin areas
- Embedded artwork
- Decorative objects
- Delicate surfaces
Work slowly and check your progress regularly to avoid sanding through the resin layer.
400–1500+ Grit: Fine and Matte Finishing
Finer grits are typically used when you want a very smooth surface or a controlled matte finish.
A progressive sequence might include:
320 → 600 → 1000 → 1500 grit
For finer finishing, wet sanding is often used. Always follow the recommendations for your specific resin and finishing products.
How to Sand Epoxy Resin by Hand
Hand sanding is an excellent choice for small projects and detailed work. It gives you more control and reduces the risk of removing too much material too quickly.
Start with the appropriate grit for the condition of your epoxy. Wrap the sandpaper around a sanding block when working on a flat surface to help maintain even pressure.
Use consistent, controlled movements and avoid concentrating on one spot for too long.
Stop frequently to inspect the surface. This is particularly important when sanding near artwork, pigments, embedded materials, or thin sections of epoxy.
After sanding, remove the dust with a vacuum, soft brush, or slightly damp lint-free cloth. Allow the surface to dry completely before applying another epoxy layer.
Can You Use an Electric Sander on Epoxy Resin?
Yes, an electric sander can make sanding faster, especially for large tables, countertops, panels, and other large epoxy projects.
However, power sanding requires careful control.
Keep the sander moving and avoid applying excessive pressure. Do not hold the tool in one position for too long, as friction can generate heat and potentially affect the resin surface.
For the best results:
- Keep the sanding pad flat
- Use light, even pressure
- Let the tool do the work
- Avoid tilting the sander
- Move continuously across the surface
- Check progress regularly
A power sander can remove material quickly, so it is often wise to begin with a less aggressive approach unless major leveling is required.
How to Sand Epoxy Resin Before Applying Another Coat
If you are adding a new layer over fully cured epoxy, surface preparation is essential.
A cured epoxy surface is generally smooth, which can reduce the mechanical grip of the next layer. Light sanding creates microscopic texture that helps the fresh epoxy bond more effectively.
Here is a simple process:
Step 1: Scuff the Entire Surface
Use suitable sandpaper to lightly and evenly scuff the cured epoxy. Make sure you prepare the entire area that will receive the new resin layer.
You do not need to sand deeply. The goal is surface texture, not heavy material removal.
Step 2: Remove All Sanding Dust
Dust left behind can affect the appearance of the next coat.
Vacuum the surface or use a soft brush to remove loose particles. Then carefully wipe the surface with a suitable clean cloth.
Pay close attention to:
- Wood grain
- Cracks
- Bubble holes
- Textured areas
- Corners and edges
Step 3: Make Sure the Surface Is Clean and Dry
Do not apply fresh resin until the prepared surface is completely clean and dry.
Once properly prepared, you can apply the next epoxy layer according to the product instructions.
How to Fix Bubbles, Dust, and Other Epoxy Resin Imperfections
Sanding is one of the most effective ways to repair defects in cured epoxy.
Common problems include:
- Surface bubbles
- Dust particles
- Hairs
- Small insects
- Scratches
- Dimples
- Uneven areas
For minor defects, sand the affected area carefully until the imperfection has been removed or reduced. If the defect is deeper, continue gradually and inspect the surface frequently.
After the problem has been sanded out, clean the entire surface and apply a new coat if needed.
For highly visible projects, recoating the complete surface often produces a more uniform appearance than applying resin only to one small repaired spot.
How to Sand Sharp or Uneven Resin Edges
Resin edges can sometimes develop sharp lips, ridges, or uneven areas, particularly on molded projects.
Hand sanding is often the easiest method for correcting these areas.
You can use a sanding block, emery board, or appropriately sized piece of sandpaper. Work gradually around the edge until it feels smooth.
For flat-bottomed pieces, placing sandpaper on a flat work surface and moving the resin piece in controlled circular motions can help level the edge evenly.
Avoid repeatedly sanding only one side of the piece, as this can create an uneven profile.
How to Restore Shine After Sanding Epoxy Resin
One of the biggest concerns people have is seeing their glossy epoxy turn cloudy after sanding.
Fortunately, this is normal.
Sanding creates microscopic scratches that scatter light, making the surface appear dull. To restore a glossy finish, you can use one of several finishing methods.
Apply a Fresh Epoxy Topcoat
A thin, properly applied clear epoxy layer can restore the glass-like appearance of the surface.
This method is particularly effective for:
- Resin artwork
- Tabletops
- Decorative panels
- Countertop surfaces
Make sure the sanded surface is properly prepared and clean before recoating.
Use a Suitable Polishing Compound
For projects that do not require another resin layer, polishing can help improve clarity and shine.
Use a compatible polishing compound and a soft polishing cloth or appropriate polishing tool. Follow the product instructions and test the process on a small area when possible.
Use a Compatible Clear Finish
Some projects may use another compatible clear finishing product to restore surface gloss. Always check compatibility with your cured epoxy before applying a new coating.
How to Create a Matte Finish on Epoxy Resin
Not every epoxy project needs a high-gloss finish. A smooth matte or satin appearance can create a modern, premium look.
For a matte finish, use progressively finer sandpaper and work evenly across the entire surface.
Wet sanding can help reduce dust and produce a smoother finish. Begin with a suitable grit and move gradually to finer grits.
For example:
- Sand with 320 grit
- Clean the surface
- Continue with 600 grit
- Clean again
- Finish with 1000 or 1500 grit as needed
Do not move to a finer grit until the scratches from the previous step have been refined.
Once finished, clean and dry the surface thoroughly. Depending on the desired appearance, a compatible finishing product may be used to adjust the final level of sheen.
Common Mistakes to Avoid When Sanding Epoxy Resin
Applying Too Much Pressure
Excessive pressure can create uneven sanding marks, grooves, and unwanted low spots.
Staying in One Area Too Long
Whether sanding by hand or with a machine, concentrating on one location can remove too much material and generate unnecessary heat.
Skipping Sandpaper Grits
Moving from a very coarse grit directly to an extremely fine grit can make it difficult to remove deeper scratches efficiently.
Failing to Remove Sanding Dust
Dust can become trapped under a fresh resin coat and affect the final appearance.
Sanding Too Deeply
Be extra careful in the vicinity of thin resin layers or embedded artwork. Epoxy removal can reveal or harm the design if too much epoxy is removed.
Final Thoughts
Knowing how to sand epoxy resin can be a valuable skill for artists, DIY enthusiasts, woodworkers, and manufacturers. Sanding is used to fix flaws, to make cured resin smooth for further layers, to smooth rough edges, and to tailor the final look.
The most basic principles are: "Use the right grit", "Work in stages", “Apply even pressure”, “Check your work regularly”, and “Thoroughly clean your work surface before recoating or polishing.”
Keep in mind that a sanded epoxy surface might appear cloudy right out of the mold and shouldn't be a problem. A surface can be changed with proper finishing, polishing or a new clear coat.
The quality of your epoxy project can greatly depend on how careful you are in sanding. Whether you're sanding your resin tabletop or smoothing your molded pieces or even adding a matte finish to your resin art, sanding done well can improve the quality of your work.