



Updated 1 month ago
How to Polish Epoxy Resin Jewelry for a Smooth, Glossy Finish

hqt

Epoxy resin jewelry is sought after due to its durability, creativity and beautiful glass-like finish. But even the most carefully cast pieces of resin can end up with rough edges or a cloudy surface or have minor imperfections. Fortunately, polishing epoxy resin jewelry is a simple process that can be done with the correct tools and a step-by-step approach of sanding and polishing.
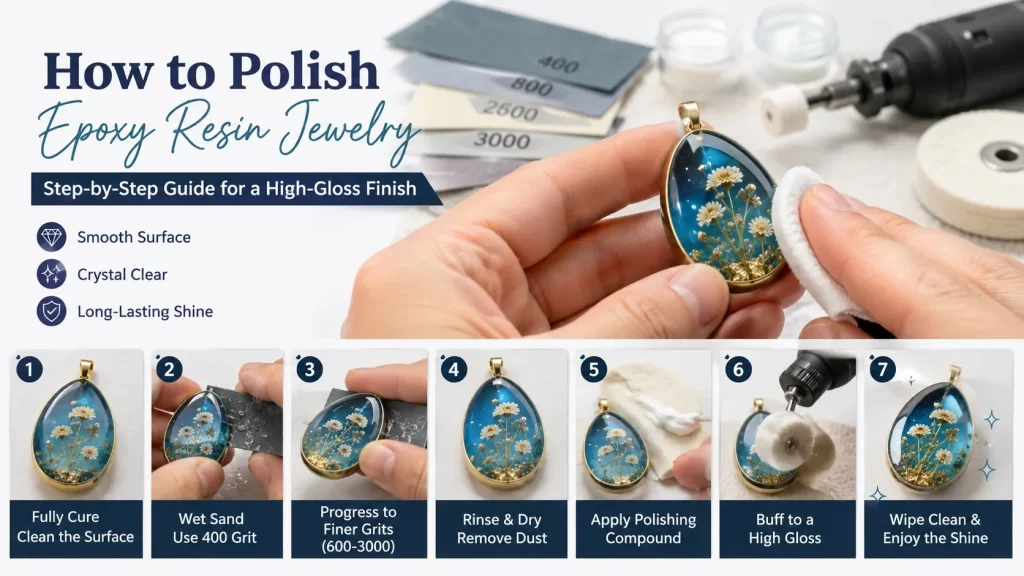
It is not the grind that makes it look good but the surface preparation. The steps are: Inspect, wet-sand, polish with increasingly fine grits, polish with polishing compound and buff to a high gloss. This technique will work great on resin pendants, earrings, rings, charms, keychains and any other small resin projects that have been made in epoxy.
Why Polish Epoxy Resin Jewelry?
The surface of the freshly cured epoxy may not necessarily be smooth and may be glossy in appearance. Imperfections of mould, beveling, small scratches, fingerprints, or sanding marks, can cause lack of clarity in the final product.
Polishing helps:
- Remove fine sanding scratches
- Smooth rough or uneven resin surfaces
- Improve optical clarity
- Restore a glossy appearance
- Refine edges and corners
- Create a more professional jewelry finish
Surface preparation is particularly crucial for resin jewelry as it is easy to see the small scratches on resin that are compact and transparent.
What You Need to Polish Epoxy Resin Jewelry
Before starting, prepare the following tools and materials:
- Fully cured epoxy resin jewelry
- Wet/dry sandpaper
- Several sanding grits, such as 400, 600, 800, 1000, 1500, 2000, and 3000
- Clean water
- Small bowl or container
- Soft microfiber cloths
- Resin-compatible polishing compound
- Soft polishing pad, felt pad, or buffing wheel
- Sanding block or foam pad for flat surfaces
- Safety goggles
- Appropriate dust protection
To some, a 400 to 3000 grit range is a good place to begin with a lot of small resin jewelry projects. The initial grit will vary according to the surface conditions. When the scratch is very light, using an unnecessarily coarse grader will be a chore later.
Step 1: Make Sure the Epoxy Is Fully Cured
Do not rush into sanding or polishing of newly cast resin. Wait for the epoxy to cure as per manufacturer's recommended curing time.
The resin must be hard and stable, not soft, flexible or sticky. Improper handling of an incompletely cured resin can yield poor results, and can harm the surface.
It's also important to thoroughly clean the jewelry prior to polishing. If there are dirt, dust, mold residue, etc., remove them so they don't affect the sanding process.
Step 2: Start Wet-Sanding the Resin
The basic element of a high gloss is sanding. Deep scratches and an uneven surface will not be covered by polishing compound.
Use an appropriate grit depending on the condition of the jewelry. If the imperfections are moderate, approximately 400 grit might be suitable. Use a finer grit for a relatively smooth surface, having just a few marks.
Gently sand the resin with the wet/dry sand paper taking care not to apply any pressure to the resin surface. Continue to keep surface moist during the process.
There are a number of benefits to wet-sanding. It decreases the amount of airborne resin dust, maintains cooler surface and makes the sanding action smoother.
Do not exert excessive pressure. Too much pressure will result in uneven areas, particularly when it comes to small pieces of jewelry.
Tip: Use a Sanding Block
Wrapping sandpaper around a small sanding block or foam block will help keep the surface flat for flat resin pendants or rectangular resin pieces.
If you're creating curved jewelry, use your fingers or flexible sanding pad so that you don't flatten out any important details as you work.
Step 3: Progress Through Finer Grits
Once the major imperfections have been removed, gradually move to finer sandpaper.
A practical sequence may look like:
400 → 600 → 800 → 1000 → 1500 → 2000 → 3000 grit
You don't always have to use all of the grits for every project. The main thing is to ensure that the scratches from the last grit are removed before continuing.
If, for instance, 400 grit is used, the surface will appear dull, and you can see sanding marks. Once the 600 and 800 grit marks have been reached, they should get finer and finer.
A surface of 1000 to 1500 grit turns its surface a bit softer and more translucent. Grits 2000 and 3000 can help to further polish the surface before applying the next higher grit.
Avoid skipping too rapidly between grits. Polishing compound may not completely remove deep scratches that may be left from a previous sanding.
Step 4: Pay Attention to Edges and Corners
Edges are some of the easiest parts of resin jewelry to damage during sanding.
Use light pressure around:
- Sharp corners
- Thin edges
- Holes for jewelry findings
- Raised patterns
- Embedded decorations
- Curved surfaces
Avoid over-sanding one particular area. Try to maintain consistent movement so the shape of the jewelry remains intact.
If your resin piece contains flowers, glitter, pigments, photographs, or other embedded materials, work especially carefully around areas where the decorative elements are close to the surface.
Step 5: Clean the Jewelry Before Polishing
Once the last sanding step is completed, rinse the object.
Clean to eliminate all abrasive particles and resin residue. Next air dry the jewelry thoroughly with a clean microfiber cloth.
This step is significant because the excess of the coarse particles can contaminate the polishing pad, and cause new scratches.
Examine surface using good light. If any sanding lines or cloudy areas are still clearly visible, go back to the correct sanding grit, rather than attempting to resolve the issue by adding more polishing compound.
Step 6: Apply a Resin-Safe Polishing Compound
After proper refinement, use a small quantity of polishing compound on a clean soft cloth, buffing pad or suitable buffing pad.
Use polishing compound as directed by the manufacturer and for application and compatibility.
Hand polishing is a great way to achieve control in the case of small jewelry. Gently apply pressure and move in small circles over the surface of the resin.
If you need to produce larger quantities or repeat the job, a good rotary polishing machine will save you time. But apply gentle pressure and slow pace to avoid transferring too much heat.
Step 7: Buff the Epoxy Resin to a High Gloss
Bump the surface until the cloudiness slowly wanes off and the surface starts to reflect light.
Please keep in mind that polishing compound will not remove heavy scratches. When there are still noticeable scratches, cease polishing and resume to an appropriate sanding level.
After desired gloss, use a clean microfiber cloth to remove the compound from the jewelry.
The surface should be smooth, shiny, and reflective.
Common Mistakes When Polishing Resin Jewelry
Starting With Sandpaper That Is Too Coarse
Using an unnecessarily coarse grit can create deep scratches that require several additional sanding stages to remove.
Skipping Sanding Stages
Jumping directly from coarse sandpaper to polishing compound often leaves visible scratches. A progressive grit sequence creates a much better foundation.
Using Too Much Pressure
Heavy pressure can create uneven surfaces and excessive heat. Gentle, consistent sanding is generally more effective.
Dry-Sanding Without Proper Control
Wet-sanding is commonly recommended for resin finishing because it helps control dust and heat. Keep the work surface and abrasive appropriately lubricated with water when using wet/dry sandpaper.
Polishing an Uncured Surface
Epoxy should be fully cured before sanding and polishing. Otherwise, the surface may behave differently from fully hardened resin.
Using a Dirty Polishing Pad
A contaminated pad can transfer abrasive particles back onto the jewelry and create new scratches. Use clean pads and cloths for each polishing stage.
Can You Polish Epoxy Resin Jewelry by Hand?
Yes. Hand polishing is particularly practical for small jewelry pieces.
A microfiber cloth or soft felt pad allows you to control pressure and reach curved areas that may be difficult to polish with a machine. Rotary tools can be useful, but they are not essential.
For beginners, hand polishing is often the safest way to learn how resin responds to different abrasives and polishing compounds.
How to Get a Glass-Like Finish
The secret to a glass-like epoxy resin finish is surface preparation rather than simply adding more polish.
A reliable workflow is:
Fully cure → clean → wet-sand → progressively refine → inspect → clean → apply polishing compound → buff → final wipe
The more carefully you remove scratches at each sanding stage, the easier it becomes to achieve a high-gloss finish during the final polishing step. Professional resin finishing guides similarly emphasize progressive sanding and careful polishing rather than trying to correct major surface defects with compound alone.
Frequently Asked Questions
Can you polish cured epoxy resin jewelry?
Yes. Fully cured epoxy resin can be sanded and polished to improve smoothness, clarity, and gloss.
What grit sandpaper is best for polishing resin jewelry?
A common beginning grit is in the range of 400 to 2000 or higher you can go up to 3000 grit. Depending on the condition of the resin, the first grit size can vary.
Why does my polished resin still look cloudy?
If there is some cloudiness, it may be a sign that there are still some sanding scratches. Go back to the set sanding stage, use increasingly finer sanding media, clean it and repeat the sanding process.
Can I polish resin without a machine?
Absolutely. Use of wet/dry sandpaper, polishing compound, and a microfiber or soft cloth can be effective for polishing small epoxy resin jewelry items.
How do I avoid scratches after polishing?
Make sure that your sanding sequence is organized, clean the piece between sanding steps, use clean sanding and polishing materials, and don't bring coarse abrasive into the last sanding step.
Final Thoughts
Understanding the process of polishing epoxy resin jewelry can definitely enhance the look and value of handcrafted resin jewelry. Following a few very basic guidelines is essential: leave the epoxy to cure properly, start with the correct sanding grit, then gradually move up to smaller grits, keep the surface clean at all times, and end with a suitable polishing compound.
With resin earrings, pendants, rings, charms and decorative accessories, patience is the secret to a smooth, clear finish with a high shine. By following the appropriate sanding process and applying the proper polishing method, even a scratched or dull epoxy surface can be turned into a professional finish.