





Epoxy resin tables are made using resin that is cured over a beautifully designed wood table. Whether it's a river table or ocean-themed designs, geode patterns, or even embedding objects, epoxy provides virtually endless options for custom furniture.
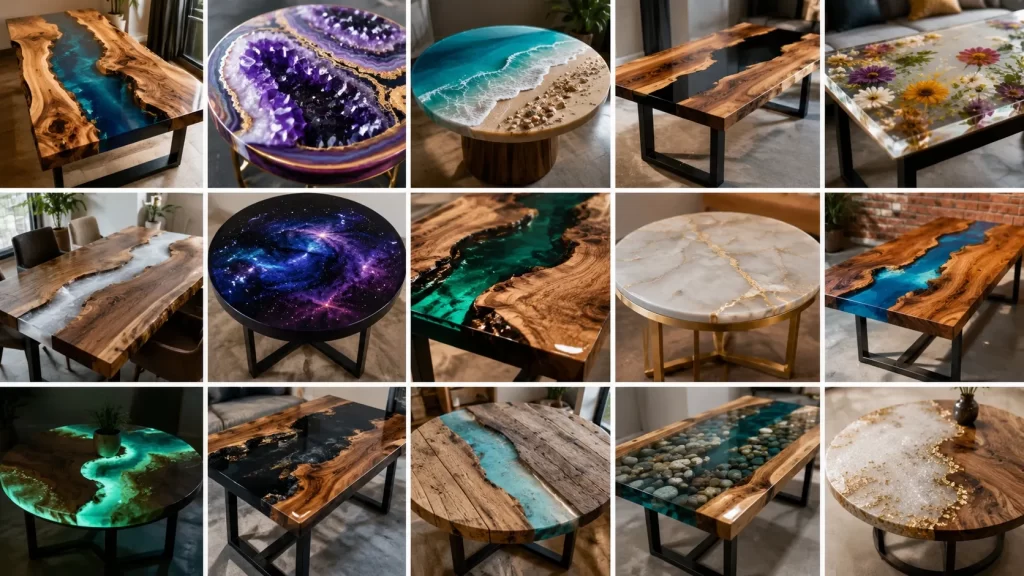
From a new resin crafter looking for their first resin project to an advanced crafter, who wants inspiration for their next one, the proper epoxy table ideas can help you create a standout tabletop.
This guide shows you some of the most popular epoxy table designs, materials, tips and the basic steps of how you can make a beautiful resin table.
What Is an Epoxy Resin Table?
Epoxy resin table is a type of furniture made from two part epoxy resin to fill cracks, gaps, voids or decorative parts in the wood. When mixed with the hardener according to the manufacturer's directions, the resin turns into a hard, durable surface.
Natural wood grain can be emphasized with clear epoxy and decorative additives and pigments can be used to produce dramatic effects. Epoxy is particularly favored in the realm of live-edge furniture for its ability to fill in natural openings but maintain wood character.
If you are looking for tabletop projects, select a resin designed for furniture or tabletop projects. The depth of pouring, curing time, UV resistance, and heat-performance properties of the different products vary, so please refer to the technical instructions of the manufacturers.
1. Classic Epoxy River Table
One of the best known resin furniture designs is the epoxy river table. Two wooden sections are placed with a gap in between and colored or clear epoxy is poured into the gap to simulate a river flow.
You can use blue, which looks like water, or other colours:
- Transparent clear resin
- Emerald or forest green
- Deep black
- White
- Metallic gold or silver
- Custom color combinations
These contrast particularly well with colored resin, especially with walnut and cherry.These contrasts can be especially nice with colored resin, particularly with walnut and cherry.
A curved river instead of a straight channel will create a more dramatic design. It is also possible to mix multiple shades of resin for depth of field.
2. Live Edge Epoxy Table
A live edge epoxy table has the original shape of a table slab, but also has resin used to stabilize or decorate the cracks, knots, or voids in the wood.
This strategy is suitable for:
- Dining tables
- Coffee tables
- Desks
- Conference tables
- Bar tops
If you want to highlight the original wood grain, then clear epoxy is a great choice. If the tabletop is to be an artistic focus, colored resin can be used.
Each live-edge slab will be different and each table finished will therefore be unique.
3. Ocean Wave Table
For an oceanic feel, try epoxy tables with an ocean design.
Layering multiple shades of blue, turquoise, white and transparent resin to create waves and moving water. The white pigment can be carefully manipulated to give a foamy appearance.
You can add to the theme by adding:
- Sand
- Sea shells
- Sea glass
- Small decorative elements
- Transparent blue resin
Layering is the key to ocean effect: Don't combine all the colors; use various colors and shades to achieve depth and motion.
4. Geode Epoxy Table
A geode table is a tabletop that is turned into a work of art that resembles a crystal.
The common geode is a design made of multiple colors, in random shapes. Natural minerals can be simulated with metallic pigments, glitter, crushed glass or translucent resin.
Popular combinations include:
- Purple, white, and silver
- Blue, turquoise, and gold
- Black, gray, and metallic silver
- Amber, white, and gold
When making geodes, the colors, borders, and decorative materials need to be coordinated in appearance, which means that more thought needs to be given to the design than if the globe was to be just coated in clear epoxy.
5. Clear Epoxy Wood Table
Often times it is the simple things that make your result the most elegant.
The natural wood is the focal point with a clear epoxy tabletop. The resin gives a smooth and shiny look, and highlights knots, grain patterns and blemishes.
The style is suitable for high quality hardwood slabs.
For a minimalist interior, pair the clear resin tabletop with a simple black or metal leg. It can create a contemporary look, but not dominate the space.
6. Galaxy-Inspired Resin Table
If you want a more dramatic effect, make a tabletop inspired by a galaxy, in dark resin, metallic pigments, glitter and careful colour application.
Black, navy, purple, blue and white can be used together for a cosmic look. You can use glitter to represent stars in small quantities and lighter pigments to form Nebula like patterns.
The design is particularly suitable for coffee tables, gaming tables, and innovative work stations.
7. Embedded Object Table
Another creative epoxy table idea is to permanently set objects under a clear epoxy surface.
Possible materials include:
- Dried flowers
- Leaves
- Shells
- Coins
- Decorative stones
- Photos
- Small collectibles
Before embedding, objects should be clean and all wet. Sealing can be useful for many porous materials, even before the sealing with epoxy is performed.
A thin preliminary layer of resin may be used to hold items in place until more resin is poured. Planning the layout in advance is crucial as it will be difficult to modify cured epoxy.
8. Botanical Epoxy Table
Using dried flowers, leaves, grass or other decorative plants, nature lovers can construct a botanical tabletop.
A clear resin background retains the design's brightness and visibility. Botanicals can be used symmetrically for a classic and elegant look, or used organically, in the curve of the wood for a more natural and sculptural feel.
This style is well suited for side tables, coffee tables and small accent furniture.
9. Marble-Effect Epoxy Table
A tabletop in the shape of a marble can give a luxurious stone appearance to a table without the need of a solid marble slab.
Use a light base color (white, cream, light gray). Carefully add veins in grey, black, gold or metallic color.
The best results will likely be in the irregular veins, not the straight lines.
Marble epoxy tabletop is suitable for modern kitchens, offices, reception or contemporary interior.
10. Glow-in-the-Dark Epoxy Table
To add a really dramatic effect, add phosphorescent pigment to certain sections of the resin.
Stained glass windows can make a dramatic effect in a dark wood at night. There are also various options to try:
- Star patterns
- Constellations
- Abstract glowing lines
- Glowing cracks
- Galaxy designs
Follow manufacturer's recommended ratios of pigments and resin. Test a small sample of it before putting it on the whole tabletop.
11. Metallic Accent Table
In order to make a stunning epoxy table look incredible, you don't have to use a dozen colours.
Clear resin and metallic gold, silver, copper or bronze can create a sophisticated look.
For instance, a narrow channel in the metallic resin can provide a good contrast to the wooden tabletop and modern decoration.
Metals accents work well when used sparingly.
12. Black Epoxy and Wood Table
Black epoxy is a dramatic accent to natural wood.
Can fill large cracks, be used to form river channel, or to make geometric sections across the tabletop.
Black resin will complement the colors of:
- Walnut
- Oak
- Ash
- Maple
- Reclaimed wood
Pairing black epoxy with warm wood tones can create a modern industrial appearance.
13. Reclaimed Wood Epoxy Table
Recycled wood can add to an epoxy table's appeal.
Interesting textures, nail holes, cracks, and color variations can be found in old beams, weathered boards and salvaged wood. Epoxy can be used to fill selected defects, without altering the history of the material.
When using reclaimed wood, clean off contaminants, loose material, nails and unstable sections. Ensure wood is dry enough and structurally appropriate for furniture-making.
14. Epoxy Coffee Table
Resin furniture can be a great addition to any home, even if you don't have a large dining table.
A smaller epoxy coffee table may be a useful initial project. Less material is needed and it allows for some experience in mixing, pouring, controlling color, removing bubbles, sanding and polishing.
Coffee table designs are popular such as:
- Small river tables
- Clear wood slabs
- Ocean designs
- Geode patterns
- Embedded botanical tables
- Geometric resin designs
A simple wood slab with a clear flood coat is a good starting point for beginners.
15. Epoxy Table With a Creative Base
The tabletop is only part of the design. An unusual base can completely change the appearance of an epoxy table.
Popular options include:
- Hairpin metal legs
- Industrial pipe frames
- Geometric steel bases
- Wooden pedestal bases
- Reclaimed machinery parts
- Sculptural metal supports
Make sure the base is strong enough to safely support the finished tabletop. Large epoxy tables can become surprisingly heavy, so stability should always be considered during the design stage.
How to Make an Epoxy Table
Although designs vary, the basic process is similar.
Step 1: Prepare the Wood
Select dry, stable wood and remove loose bark or unstable material. Sand the surface and clean away dust.
Step 2: Seal Cracks and Voids
Seal areas where resin could escape. This is particularly important when working with live-edge slabs.
Step 3: Build a Mold
Create a level mold around the tabletop. The mold must be properly sealed so liquid resin cannot leak underneath.
Step 4: Mix the Epoxy
Measure resin and hardener precisely according to the product instructions. Mix slowly and thoroughly to reduce unnecessary air incorporation.
Step 5: Add Color or Decorative Materials
Add compatible pigments, mica powder, glitter, or other approved materials. Avoid adding excessive amounts of colorant because it can affect curing performance.
Step 6: Pour the Resin
Pour according to the resin's recommended maximum depth. Deep-pour products and tabletop-coating products are designed for different applications, so do not assume one resin can replace another.
Step 7: Remove Bubbles
Use the bubble-removal method recommended by the resin manufacturer. Work carefully because excessive heat can damage the resin or create other defects.
Step 8: Allow Full Curing
Leave the project undisturbed for the recommended curing period. Temperature, humidity, pour depth, and resin formulation can all affect curing.
Step 9: Sand and Polish
Once fully cured, flatten the surface if necessary and progressively sand it using increasingly fine abrasives. Finish with polishing or a suitable protective coating depending on the desired appearance.
Tips for Better Epoxy Table Results
For consistent results, pay attention to the fundamentals:
Choose the right resin. Select a product designed for your pouring depth and application.
Keep the wood dry. Moisture can contribute to bubbles, adhesion problems, and other defects.
Work on a level surface. A slightly uneven mold can produce an uneven tabletop.
Measure accurately. Incorrect resin-to-hardener ratios can lead to soft or improperly cured epoxy.
Control the environment. Follow the manufacturer's recommended temperature and humidity range.
Test colors first. A small sample can show how pigments will look after curing.
Protect yourself. Wear appropriate gloves, eye protection, and other PPE specified by the resin manufacturer, and ensure adequate ventilation.
How to Choose the Best Epoxy Table Idea
The ideal design will vary based on your experience, furniture style, budget and available space.
A clear epoxy wood table or small table, like a coffee table, is often easier for beginners to work with than a large river or geode table.
River tables, ocean effects, embedded objects and artistic designs in multiple colors offer more opportunities for experimentation for the more advanced makers.
Select clear resin and live edge wood if you're looking for natural beauty. You can also choose a geode or galaxy design or an ocean design for a dramatic centerpiece.
Final Thoughts
The best ideas of epoxy tables are those that can be created in an imaginative and functional way. Epoxy can be used to make furniture that is both functional and unique, with a variety of finishes and designs available to suit different tastes.
Begin with a design that is appropriate to your skill level, choose the right resin for the project, carefully prepare the wood and follow the mixing, pouring, and curing directions provided on the product. By working patiently and with proper preparation, an epoxy table can be a long-lasting focal point that combines a natural wood aesthetic with modern design.