




With its combination of durability, ease of maintenance, and clean, professional look, epoxy flooring is a popular choice for garages, warehouses, workshops, commercial buildings and industrial facilities. With proper installation, an epoxy floor can help to shield concrete from heavy traffic, stains, moisture, abrasion, and all other forms of wear and tear.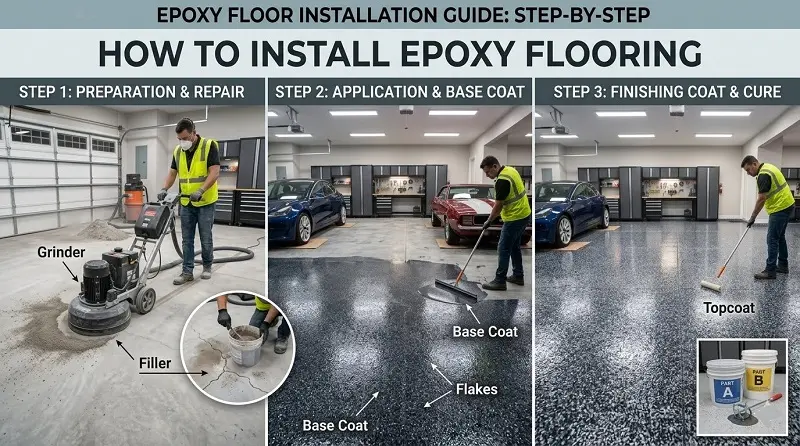
However, how to install epoxy flooring properly? Surface preparation, type of epoxy system, application conditions and curing time are all important influences in determining the answer.
This guide will outline the process of installing an epoxy floor, including the preparation of the concrete surface, the application of the epoxy, and the curing and finishing process.
What Is Epoxy Flooring?
Epoxy flooring is a system of epoxy floors that is formed by a combination of epoxy resin and a hardener. The two components react to create a strong durable surface that will bond to an appropriate substrate.
Epoxy floors are available in various different finishes including smooth, glossy, coloured, decorative and textured. They can also have anti-slip features and extra protection in an environment that is demanding, depending on the product and installation.
Common applications include:
- Residential garage floors
- Commercial workshops
- Warehouses and storage facilities
- Manufacturing plants
- Retail spaces
- Showrooms
- Commercial kitchens
- Service areas
- Industrial facilities
The right epoxy system depends on the floor's condition, expected traffic, chemical exposure, moisture levels, and intended use.
How to Install Epoxy Flooring Step by Step
Step 1: Choose the Right Epoxy Flooring System
Once you know what the project requires, you need to decide on which type of epoxy is best for the job before installation.
Water based epoxy, solvent based epoxy and 100% solids epoxy are common types of epoxy. Each system possesses various features, uses, curing times and performance.
A forklift and heavy industrial traffic environment in a warehouse could have different needs than a residential garage.
The following factors should be taken into consideration when selecting an epoxy system:
- Expected foot or vehicle traffic
- Chemical and oil exposure
- Moisture and water exposure
- Indoor or outdoor conditions
- UV exposure
- Slip-resistance requirements
- Desired appearance
- Required durability
Choosing the wrong product can lead to poor adhesion, premature wear, peeling, or other flooring problems.
Step 2: Inspect and Prepare the Concrete Floor
Concrete floor preparation is one of the most important stages of epoxy installation.
Epoxy does not simply cover problems underneath the surface. Cracks, contamination, moisture, weak concrete, old coatings, and uneven areas can affect adhesion and the final appearance.
Begin by inspecting the concrete for:
- Cracks and holes
- Uneven areas
- Surface damage
- Moisture problems
- Existing paint or coatings
- Oil and grease contamination
- Dirt and dust
Old coatings may need to be removed before installation. Depending on the condition of the substrate, mechanical grinding or other preparation methods may be required to create a suitable surface profile.
The floor should then be thoroughly cleaned and degreased. Oil, grease, chemicals, dust, and loose debris must be removed before the epoxy is applied.
Step 3: Repair Cracks and Surface Defects
Before applying primer or epoxy, repair visible cracks, holes, divots, and other significant surface defects.
Small imperfections can become more noticeable after the epoxy coating is applied. More importantly, active cracks or structural problems may compromise the flooring system.
Allow repair materials to cure according to the manufacturer's recommendations before proceeding.
If the concrete has significant moisture issues or structural damage, address those problems before installing an epoxy system.
Step 4: Apply the Epoxy Primer
A suitable primer can help improve adhesion between the prepared concrete and the epoxy system.
The primer should be applied evenly across the prepared surface using the appropriate roller, squeegee, or other application equipment.
Follow the manufacturer's instructions for mixing ratios, coverage rates, temperature, humidity, and recoat windows.
Do not rush this stage. Proper priming and surface preparation are essential for achieving a strong and long-lasting epoxy floor.
Step 5: Mix and Apply the Epoxy Coating
Once the primer is ready, the epoxy components can be mixed according to the manufacturer's specified ratio.
Accurate mixing is critical. Incorrect proportions can affect curing, hardness, adhesion, and overall performance.
After mixing, epoxy has a limited working time. The original Policrete guide notes that some epoxy coatings may have a working life of approximately 30–40 minutes after mixing, depending on the specific product and conditions.
Apply the epoxy evenly using a roller, squeegee, or other suitable equipment.
Work systematically across the floor and maintain a consistent application thickness. Avoid applying too much material in one area or leaving thin spots in another.
Step 6: Apply a Second Coat or Topcoat
Depending on the flooring system and project requirements, a second epoxy coat or protective topcoat may be necessary.
Allow the first coat to cure within the manufacturer's recommended recoat window. The original source recommends approximately 24 hours before applying another coat, but actual timing can vary according to temperature, humidity, product formulation, and substrate conditions.
Before applying the next layer, inspect the surface carefully. Lightly sand or correct imperfections when required, and remove all dust before continuing.
A suitable topcoat can provide additional protection against abrasion, chemicals, moisture, UV exposure, or heavy traffic.
How Long Does Epoxy Flooring Take to Cure?
One common question is: How long does epoxy flooring take to cure?
The answer depends on the product and environmental conditions.
An epoxy floor may feel dry within approximately 12–24 hours, but that does not necessarily mean it has reached full strength. Heavy traffic and vehicles should be kept off the surface until the flooring has sufficiently cured.
The original Policrete guide recommends avoiding driving or parking vehicles on the floor for at least 72 hours and allowing approximately a week before normal use. It also notes that complete curing can take longer.
Always follow the technical data sheet provided by the epoxy manufacturer because curing requirements vary between systems.
Important Factors Before Installing Epoxy Flooring
Existing Floor Condition
Existing paint, vinyl, sealers, oil stains, and other contaminants may prevent epoxy from bonding correctly. These materials may need to be removed before installation.
Moisture
Moisture is a major consideration when installing epoxy over concrete. Excess moisture or moisture vapour transmission can contribute to adhesion problems and coating failure.
Traffic and Usage
A garage, warehouse, factory, and retail space do not experience the same level of wear. Select an epoxy system based on the actual conditions of the site.
Slip Resistance
Smooth epoxy surfaces can become slippery when wet. If the floor will frequently encounter water, oils, or other liquids, consider an appropriate anti-slip system.
Chemicals and UV Exposure
If the floor will be exposed to aggressive chemicals, industrial fluids, or direct sunlight, choose a coating system specifically designed for those conditions.
How to Maintain an Epoxy Floor
One of the major advantages of epoxy flooring is relatively simple maintenance.
For routine care:
- Sweep or vacuum regularly to remove dirt and abrasive particles.
- Mop the surface with a suitable damp mop.
- Clean spills promptly.
- Use cleaning products recommended for the specific flooring system.
- Avoid aggressive chemicals unless the epoxy system is designed to withstand them.
- Avoid dragging heavy equipment or furniture across the surface.
- Repair damaged areas before small problems become larger ones.
Regular cleaning can help preserve the appearance and performance of the floor for years.
Should You Install Epoxy Flooring Yourself?
While a DIY epoxy floor may be an option for small residential jobs, larger commercial or industrial projects might consider professional epoxy flooring.
It is not as hard as it may seem to apply the coating. The final results may vary depending on the surface preparation, moisture content, product selection, mixing, thickness of application, and curing conditions.
Professional contractors know how to prepare concrete and have the right tools at their disposal to help them determine the right flooring system for the property.
Final Thoughts
Epoxy flooring installation isn't just about rolling resin over concrete. The first steps in a successful project are to choose the proper epoxy system and to prepare the substrate properly.
The fundamental steps are concrete inspection, cleaning and degreasing, cracking repair and surface repair, mechanical preparation, priming, epoxy application, additional coats or topcoats and adequate cure time.
In light-duty spaces such as garages, a home-improvement solution could work. Professional epoxy flooring installation can help provide a more consistent and durable finish to the floor for a warehouse, factory, commercial facility or area with high use and chemicals.
With proper preparation of the substrate and the selection of an appropriate epoxy system, epoxy can serve as a long life, attractive and easy to maintain surface for residential, commercial, and industrial applications.