



Actualizado 1 month ago
Cómo hacer un impresionante arte de pared con resina epoxi: Guía creativa

HQT
Epoxy resin wall art is an original method of creating a wall that looks like it will never become ordinary. Resin art can produce effects that are hard to produce using classical paint, it has a glass-like finish, rich colors, flowing patterns and three dimensional depth.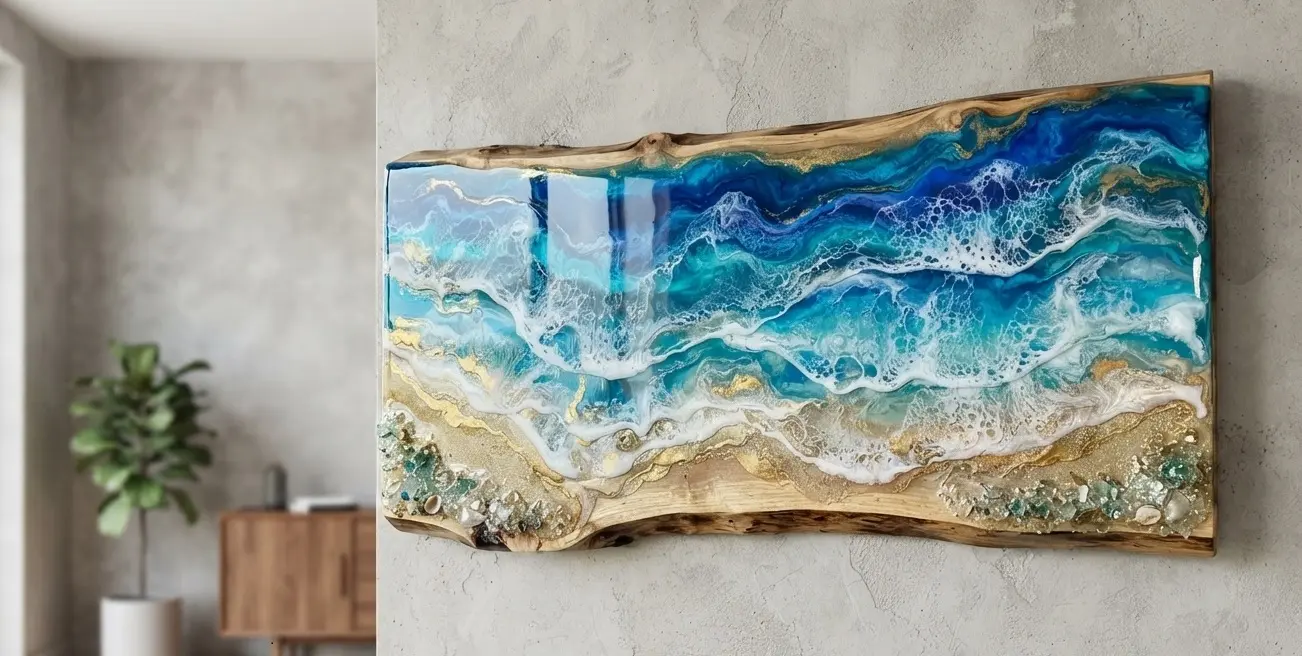
With the proper materials, a clean work space, some basic pouring skills and a bit of patience, novice artists can make stunning decorative items for their home, office, studio, or business.
This guide explains how to make epoxy resin wall art, from preparing your surface and mixing resin to creating unique designs and finishing your artwork.
What Is Epoxy Resin Wall Art?
Epoxy resin wall art is art that is made using colored or clear epoxy resin on a rigid panel, a canvas, a wood surface, or another appropriate surface. Resin can be dyed with all kinds of pigments and powders such as mica flakes, dried flowers, glitter, alcohol inks and stones.
After cured, epoxy becomes hard and shiny, improving the color and depth.
The fluidity of resin allows the artist to be able to manipulate it with various pouring and movement techniques, as it is only fluid for a limited time before it sets. This makes each resin wall art unique.
Materials You Need for Resin Wall Art
Before starting your project, prepare all materials in advance. A typical epoxy resin wall art project requires:
- Two-part epoxy resin and hardener
- Suitable art panel, wood board, or reinforced canvas
- Disposable mixing cups
- Mixing sticks
- Measuring tools or a digital scale
- Nitrile gloves and appropriate protective equipment
- Resin pigments or mica powders
- Alcohol inks, if desired
- Plastic spreaders or palette knives
- Heat gun or suitable bubble-removal tool
- Painter's tape
- Level
- Dust-free protective cover
Follow the manufacturer's mixing ratio, temperature range, curing instructions and safety recommendations. Care must be taken in handling uncured epoxy components, and safety equipment and good ventilation are significant.
Step 1: Prepare Your Workspace and Surface
One of the most critical parts of the process in making smooth epoxy resin wall art is preparation.
Select clean, flat and well-ventilated area to work in, free from excess dust, direct sunlight and unnecessary movement. Cover your table with plastic or other disposable tablecloth.
Your artwork should also be clean and dry. Clean surfaces of dust, dirt, grease and loose particles before applying resin. In the case of a porous or absorbent material, it may be advisable to seal the top first. It is recommended to test any sealant and resin on a sample to prevent an adverse reaction or color change.
In the case of a stretched canvas, make sure to "glue" it first before adding any considerable amount of resin. The extra weight may drop down the canvas causing the center of the canvas to droop and collect resin.
Check to ensure your surface is perfectly level with a level. This can result in liquid resin running to one side even on a slight angle.
Step 2: Measure and Mix the Epoxy Resin
To create successful resin art, one must be able to mix it accurately.
The majority of epoxy systems are made up of two parts – resin and hardener. This ratio will differ depending on the product, so be sure to read the manufacturer's directions, not assuming that all epoxies follow the same ratio.
Accurately measure the two components and mix them in a clean mixing cup. Mix slowly and thoroughly, scraping the sides and bottom of the mixing container. Mixing well will help to achieve uniform cure and minimize the chances of soft or sticky areas.
Don't stir too heavily or air will be introduced into the mix.
When the resin is completely mixed, if you are making multiple colored pieces, portion into smaller cups.
Step 3: Add Colors and Create Your Design
Here's where you can do your creative magic.
Gradually add mica powder, resin pigment, metallic pigment or any other colorants suitable for them. Use small quantities first as too much pigment will impact the resin's performance.
These are some of the common styles of pouring:
Dirty Pour
Pour multiple colors into the same cup and then pour the mixture onto your artwork. The colors naturally interact to create organic patterns.
Clean Pour
Pour individual colors separately onto the surface. This gives you more control over where each color is placed.
Flip Cup
Layer several colors in a cup, place it against the artwork, and carefully flip it over before lifting the cup. This technique can create dramatic flowing patterns.
After pouring, tilt the panel slowly to encourage the colors to move. A palette knife, comb, or other suitable tool can also be used to manipulate lines and shapes.
Step 4: Create Special Resin Effects
Once you understand basic pouring, experiment with advanced epoxy resin art techniques.
Ocean-inspired art: Combine deep blue, turquoise, white, and transparent resin to create waves and water effects.
Geode resin art: Create crystal-like sections using metallic pigments, glitter, stones, crushed glass, and multiple layers of resin.
Galaxy art: Use dark backgrounds with purple, blue, black, metallic pigments, and subtle glitter to create a cosmic appearance.
Abstract art: Allow different colors to flow and interact naturally for an unpredictable contemporary design.
Floral resin art: Embed dried flowers or botanical elements between carefully controlled resin layers.
Metallic powders, mica, gold leaf, and pearl pigments can add depth and visual contrast to an otherwise simple design.
Step 5: Remove Bubbles and Let the Artwork Cure
Air bubbles are common during resin pouring. After pouring, inspect the surface carefully and remove visible bubbles using an appropriate heat gun or other manufacturer-approved method.
Do not overheat the resin. Excessive heat can damage the surface, move your design too aggressively, or interfere with curing.
Once the artwork looks finished, protect it from dust and leave it completely undisturbed.
Depending on the epoxy system, the surface may become dry to the touch within roughly 24 hours, while full curing can take considerably longer. Always follow the specific manufacturer's curing schedule before moving, sanding, mounting, or displaying the finished artwork.
Common Mistakes to Avoid
Beginners can avoid many resin art problems by paying attention to a few basic details.
Incorrect mixing ratio: Too much or too little hardener can prevent proper curing.
Poor surface preparation: Dust, Petróleo, moisture, or loose particles can become permanently trapped in the resin.
Uneven workspace: An unlevel surface can cause resin to flow to one side.
Too much pigment: Excessive colorant may affect curing and transparency.
Overheating: Excessive heat can create additional problems instead of simply removing bubbles.
Moving the artwork too early: Even when the surface appears dry, the resin may still be curing underneath.
How to Display and Maintain Epoxy Resin Wall Art
After it's cured, resin wall art can be a striking focal point of a living room, bedroom, office, showroom or creative studio.
If the piece is bulky or heavy, select the types of mounting hardware that are suitable for the weight and kind of wall. Large pieces may require more support with French cleats or heavy duty mounting systems.
Regularly clean with a soft cloth and mild soap and water if required. Do not use abrasive cleaners, harsh chemicals or rough materials as they can damage the glossy finish.
Also, if possible, do not expose to direct and prolonged sunlight. Use for long term appearance may benefit by applying a resin that has UV resistance or a suitable UV-protective topcoat, but none of the resin can be claimed to be totally resistant to UV colour change.
Reflexiones finales
Epoxy resin wall art is a process that involves preparation, Aplicación, and creativity. Simple Abstract pours to detailed ocean scenes and luxurious geode designs—epoxy offers artists an almost limitless number of possibilities.
The secret is to use a good surface, use accurate measurements and mixing, maintain a good working environment and give the epoxy enough curing time. Above all, try different colors, pours, textures and decorative materials!
Each pour is a chance to learn something new, whether it's your first resin wall art project or you're building up your collection of resin art works. An ordinary panel can be transformed with practice and the right epoxy resin into a glossy, dimensional work of art that has the power to change the whole atmosphere of a room.